Where to Put Freon in Car: Essential DIY Guide
It is a hot July day. The sun is beating down on the roof of your car. You hop inside. You expect a rush of cold air. But instead, you get a blast of hot wind. It feels like a hair dryer is blowing in your face. It is miserable. I know that feeling well.
Years ago, I drove an old sedan. The AC quit on the hottest day of the year. I was sweating. I was frustrated. I thought fixing it would cost a fortune. But then, I learned a secret. You can fix this yourself. It is not as hard as it looks.
You might be asking, “Where to put Freon in car?” You are in the right place. I am going to show you how. I will guide you through every step. We will do this together. It will be safe. It will be simple. By the end, you will be cool and comfortable again.
This guide is for you. I will use plain words. No hard terms. Just clear steps. Let’s get that cool air flowing again.
What is Freon and Why Do You Need It?
First, we need to know what we are using. Freon is a gas. It lives inside your car’s AC system. It has a special job. It takes heat from inside your car. Then, it moves that heat outside. This leaves cool air for you.
Think of it like a sponge. It soaks up the heat. When the sponge is dry, it can soak up more. But if the gas leaks out, the sponge is gone. There is nothing to move the heat. So, the air stays hot.
Old Cars vs. New Cars
Not all gas is the same. Cars change over time.
- R-12: This was used in old cars before 1994. It is rare now.
- R-134a: Most cars from 1994 to 2020 use this. It is very common. You can buy it at most stores.
- R-1234yf: New cars use this. It is better for the earth.
Important Tip: Check your car manual. Look for a sticker under the hood. It will tell you what gas to use. Never mix them. Mixing them can break your AC.
My Personal Story: A Simple Mistake
I once tried to help a neighbor. He had a brand new truck. I grabbed a can of R-134a from my shelf. I almost put it in his truck. Then I saw the sticker. His truck needed R-1234yf. If I had used the old stuff, it would have cost him thousands of dollars. Always check the sticker first. It saves you money. It saves you stress.
Signs You Are Low on Freon
How do you know if you need more? Look for these signs:
- Warm Air: The vents blow air, but it is not cold.
- Clutch Cycling: You hear a click under the hood. It clicks on and off very fast.
- Low Pressure: You put a gauge on the port. It reads low.
If you see these signs, you might need a recharge.
Credit: www.youtube.com
Safety First: Read This Before You Open the Hood
We want to fix the car. But we want to be safe, too. The AC system is under high pressure. The engine has moving parts. We must be careful.
Why Safety Glasses are Not Optional
Please wear safety glasses. This is vital. Freon is very cold when it comes out. It is freezing. If it hits your eye, it can freeze it instantly. This can cause blindness. It is not worth the risk. A cheap pair of glasses can save your sight.
The Danger of Freeze Burns
I learned this the hard way. I once unscrewed a hose too fast. A little gas sprayed on my finger. It turned white instantly. It felt like a burn. But it was frostbite. It hurt for days. Now, I always wear gloves. You should too. Thick gloves protect your skin.
Keeping Clear of Moving Belts
Your engine has belts. They spin very fast. They can grab loose clothes. They can grab long hair. Before you lean in, check yourself.
- Tie back long hair.
- Tuck in loose shirts.
- Watch your hands.
Keep your fingers away from fans and belts.
Working in a Safe Place
Park your car outside. Or park in a garage with the door open. You need fresh air. Do not breathe in the gas. It is not good for your lungs. Fresh air keeps you safe.
Tools You Will Need for the Job
You do not need many tools. You can buy a kit. Here is what you need.
The AC Recharge Kit
This is the main tool. It comes with a can of gas. It has a hose. It has a gauge. The gauge is important. It tells you how much gas is inside. Do not buy a can without a gauge. You need to see the pressure.
Gloves and Glasses
We talked about this. Do not skip them. They are your shield.
A Thermometer
This helps you test the air. You put it in the car vent. It shows you if the air is getting colder. A meat thermometer works fine.
A Rag for Spills
Sometimes things drip. A rag keeps your hands clean. It keeps the engine clean.
Entity Focus: The Manifold Gauge vs. Can Gauge
Pros use a big tool called a Manifold Gauge. It has two dials. It is very accurate. But for us, the Can Gauge is okay. It comes on the recharge hose. It is simple. It has colors. Green means good. Red means stop. It is perfect for beginners.
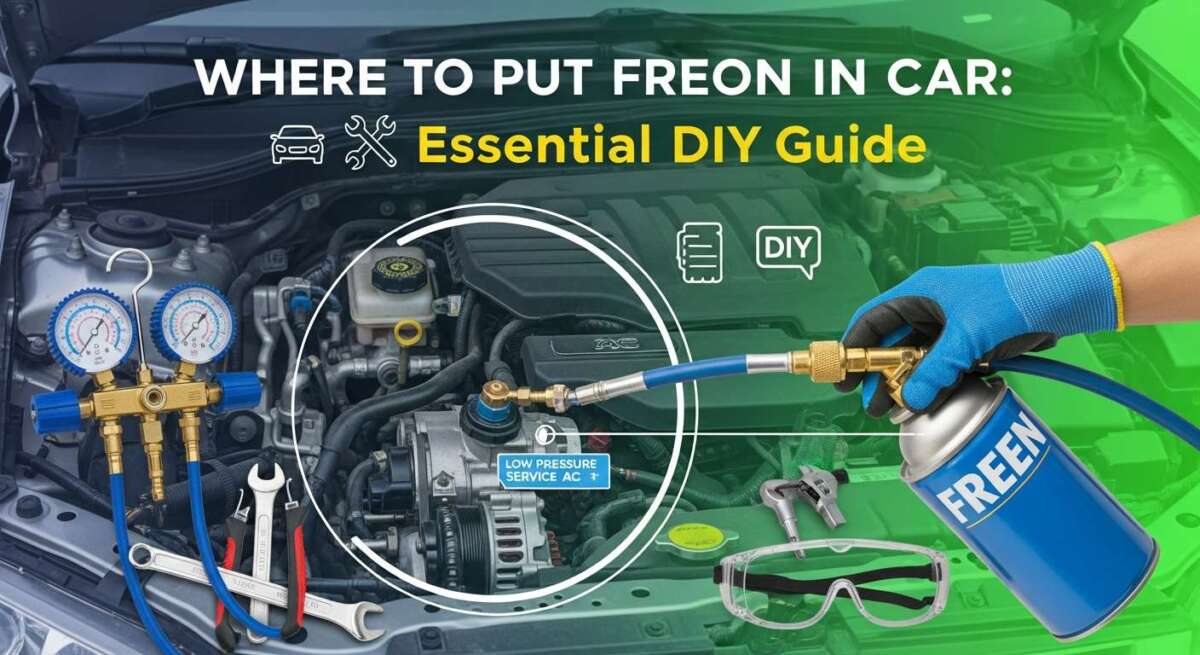
Finding the Right Spot: Where to Put Freon in Car
This is the big question. “Where to put Freon in car?” You cannot put it just anywhere. There is only one safe spot.
The High Side vs. The Low Side
Your AC has two sides.
- The High Side: This is the hot side. The pressure is very high. It is dangerous. Do not touch this port.
- The Low Side: This is the cool side. The pressure is lower. This is where we put the Freon.
How to Tell Them Apart
They look similar. But they are different sizes.
- The Low-Pressure Port: This is the one we want. The tubing is thicker. The port is smaller.
- The High-Pressure Port: This is the one to avoid. The tubing is thinner. The port is bigger.
Wait, that sounds backward. Let me say it again.
The THICK tube has the SMALL port. This is the Low Side.
The THIN tube has the BIG port. This is the High Side.
Looking for the Caps
The ports have plastic caps. They keep dirt out.
- The Low Side cap is often Blue or Black. It might have an “L” on it.
- The High Side cap is often Red or Black. It might have an “H” on it.
Always look for the “L”. If there is no letter, look at the size. Your recharge hose will only fit on the small port. It will not fit on the big port. This is a safety feature. If it does not fit, do not force it. You are likely on the wrong port.
Actionable Tip: The Squeeze Test
Here is a trick I use. With the car OFF and cool, find the metal lines.
- Squeeze the thick line. It leads to the compressor. It usually feels cool or room temperature.
- Trace it back. Look for the small port on this thick line.
That is your target. That is where to put Freon in car.
Step-by-Step Guide: How to Add Freon Safely
Now we are ready. We have our tools. We found the port. Let’s do this. Follow these steps exactly. Take your time.
Step 1: Get the Car Ready
Start with a cool car.
- Park on flat ground.
- Turn off the engine.
- Open the hood. Locate your Low-Pressure Port.
- Clean the port. Wipe the dust off the cap.
- Remove the cap. Unscrew the “L” cap. Put it in your pocket. Do not lose it.
Now, start the engine.
- Turn the car on.
- Turn the AC on Max. Set the fan to High. Set the temperature to the coldest setting.
- Open the windows. This keeps the AC working hard.
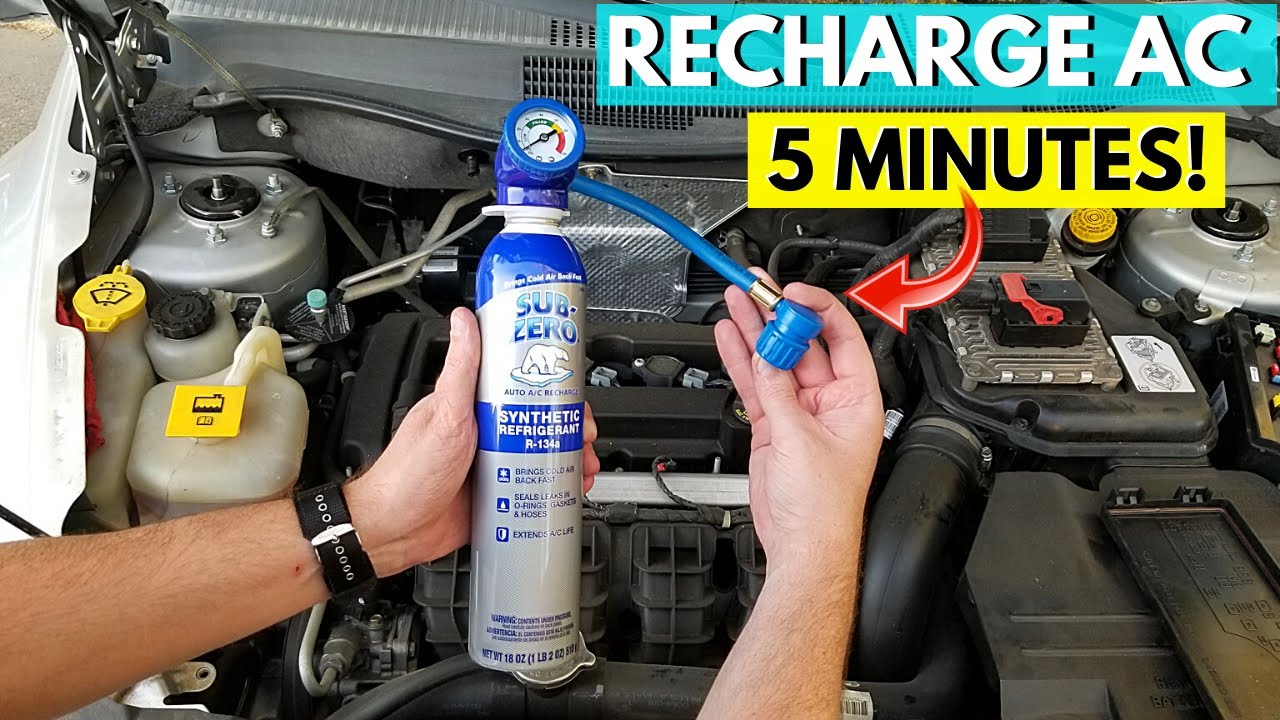
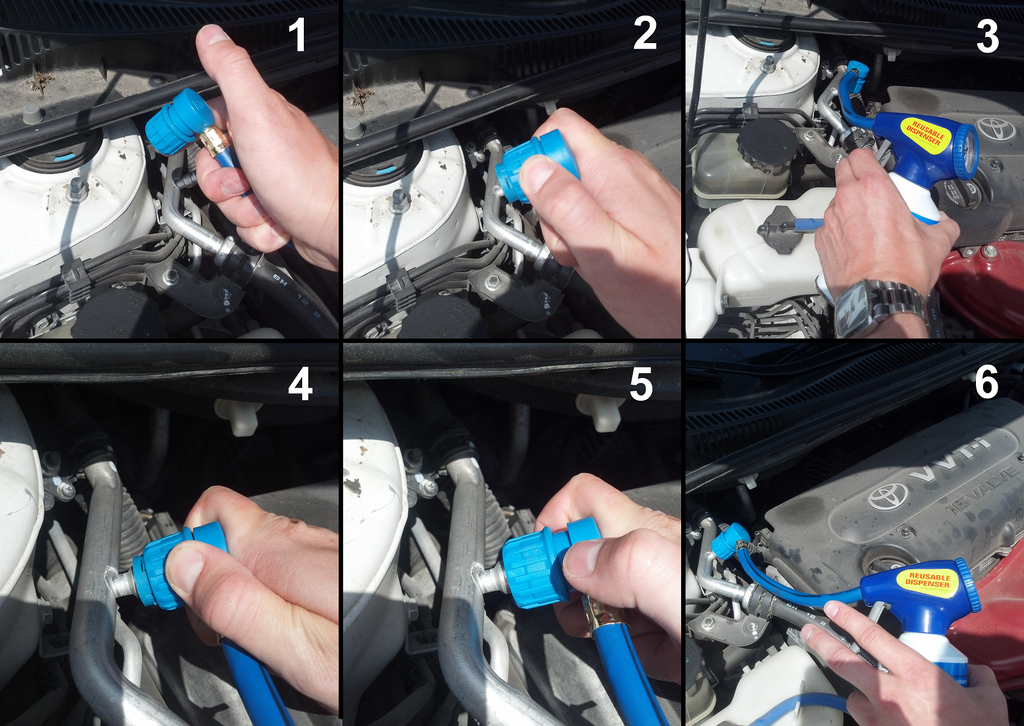
Step 2: Connect the Hose
Pick up your recharge kit.
- Shake the can. Shake it well.
- Find the connector. It is on the end of the hose.
- Pull back the ring. The connector has a sliding ring. Pull it back.
- Push it onto the port. Push it onto the Low-Pressure port.
- Release the ring. It should click.
The Pull Test:
Pull on the hose gently. Does it come off? If yes, try again. It must lock on. You want a tight seal. If it leaks, gas will escape.
Step 3: Read the Pressure First
Stop. Do not pull the trigger yet. Look at the gauge.
The gauge tells you the health of the car.
- If it reads Zero: You have a big leak. Freon will just leak out again. You might need a mechanic.
- If it reads in the Green: Your system is full. Do not add more. More is not better. Overfilling breaks the AC.
- If it reads Low (White or low Green): You can add Freon.
Understanding the Gauge Colors:
Every gauge is different. But usually:
- White: Too low.
- Green: Just right.
- Red: Warning! Too high.
- Yellow: Caution.
We want the needle in the Green.
Credit: www.instructables.com
Step 4: Adding the Gas
The gauge says low. The hose is connected. The car is running. The AC is on Max. Now we fill it.
- Hold the can up. Keep it upright.
- Squeeze the trigger. This releases the gas. You will hear a rushing sound. That is the Freon entering the system.
- Hold for 10 seconds. Count to ten.
- Release the trigger. Stop adding gas.
- Check the pressure. Look at the gauge again. Did the needle move?
The Rocking Motion
While you squeeze, move the can. Rock it gently. Move it from 12 o’clock to 3 o’clock. Like you are waving. This helps the gas flow. It keeps the can from getting too cold.
Watch the Compressor
Look at the engine. Look for the AC Compressor. It is a pump. It has a belt on it. The front face of the pump is the clutch.
- If the AC is low, the clutch might stop. Then it spins. Then it stops. This is “cycling.”
- As you add gas, the clutch should stay on. It should spin constantly. This is a good sign.
Repeat the Process
Squeeze for 10 seconds. Release. Check the gauge.
Squeeze. Release. Check.
Do this until the needle reaches the middle of the Green zone.
Do not go to the Red. Stop before you get there.
Reading the AC Pressure Chart Temperature
Pressure changes with heat. This is science. But it is simple science.
On a hot day, the pressure is higher. On a cool day, it is lower.
Most gauges have a flexible dial. You can turn it to match the outside temperature.
- If it is 70°F outside: The pressure should be around 35-40 PSI.
- If it is 80°F outside: The pressure should be around 40-50 PSI.
- If it is 90°F outside: The pressure should be around 45-55 PSI.
Actionable Recommendation:
Use a thermometer. Check the real temperature outside. Do not guess. Adjust your target based on the heat. If you fill to 50 PSI on a cool day, you overfilled it. When it gets hot, the system will burst. Be careful.
Troubleshooting: When the Recharge Doesn’t Work
Sometimes, you add gas, but it does not help. The air is still warm. Or the gauge acts weird. Let’s solve these problems.
The Compressor Won’t Turn On
You are adding gas. But the compressor clutch never spins.
- Cause: The system might be empty. The pressure switch stops the compressor to save it.
- Fix: Add half a can. If it still does not spin, you have an electrical problem. Check the fuse box. Look for a fuse marked “AC” or “COMP.” If the fuse is good, you need a pro.
The Air is Still Warm
The gauge says full. But the air is warm.
- Cause 1: The blend door is broken. This is a flap inside your dashboard. It mixes hot and cold air. If it is stuck, you get hot air.
- Cause 2: The fan is broken. The condenser fan is at the front of the car. If it does not spin, the gas cannot cool down.
Hearing Hissing Sounds (Diagnosing Leaks)
You fill it up. It works great. Next day, it is hot again.
You have a leak.
- Listen: Turn off the car. Put your head near the engine. Do you hear a hiss? That is gas escaping.
- Look: Look for oil. AC gas has oil in it. If a hose is wet or greasy, it is leaking.
Personal Experience: The Leaky Valve Stem
I once worked on a minivan. I filled it three times. It always leaked out. I could not find the hole. I looked at the hoses. I looked at the pump. Nothing.
Then, I looked at the port itself. The tiny valve inside the port was loose. It is called a Schrader valve. It looks like a tire valve. It was bubbling.
I bought a $5 tool. I tightened the valve. The leak stopped.
Lesson: Check the simple things first. Put a little soapy water on the valve. If it bubbles, tighten it.
Common Mistakes Beginners Make
I want you to succeed. Avoid these traps.
Using the Wrong Port (High Side Danger)
We talked about this. But it is vital. The High Side has very high pressure. If you force the can onto it, the can could explode. It is rare, but it happens.
Remember: If the connector fights you, stop. You are in the wrong spot.
Holding the Can Upside Down
Read the instructions on the can.
- Some cans say “Hold Upright.” This puts gas in.
- Some cans say “Turn Upside Down.” This puts liquid in.
If you put liquid into a gas pump, you can break the pump.
Rule of Thumb: Keep the can upright unless the label says otherwise.
Ignoring the Gauge
Do not just empty the can. The can might be too big for your car. Use the gauge. Trust the gauge. Stop when it is green.
Mixing Refrigerants
Do not use R-134a in an R-1234yf car.
Do not use “Stop Leak” sealers if you can avoid it. Sealers can gum up the machines at the repair shop. Mechanics hate sealers. They can ruin expensive equipment.
When to See a Pro
You are smart. You are capable. But some jobs are too big.
Go to a mechanic if:
- The Gauge stays at Zero. You have a massive hole. A can won’t fix it.
- The Compressor makes grinding noises. It sounds like rocks in a blender. The pump is dying.
- You smell burning. This could be a belt slipping.
- The system fails in a day. Fast leaks need special tools to find.
Professionals use UV dye. They use sniffers. They can find leaks we cannot see. Sometimes, paying a pro saves money in the long run.
Keeping Your Car Cool All Summer
You fixed it! The air is cold. You are happy. Let’s keep it that way. Maintenance helps your AC live longer.
Running the AC in Winter
This sounds crazy. Why run AC in the snow?
You should run it for 10 minutes once a month.
Why? The Freon has oil in it. The oil keeps the seals soft. If the AC sits all winter, the seals dry out. Then they crack. Then the gas leaks.
Running it keeps the oil moving. It keeps the seals healthy. Plus, the AC helps defrost your windows faster.
Cleaning the Condenser
The condenser is a radiator. It sits at the front of the car. It catches bugs. It catches leaves. It catches dirt.
If it is clogged, it cannot release heat. The AC works too hard.
How to clean it:
- Get a garden hose.
- Spray water gently through the grille.
- Wash away the bugs and dirt.
Do not use a pressure washer. It is too strong. It can bend the metal fins. Just use a gentle spray.
Checking Cabin Filters
There is a filter inside your car. It cleans the air you breathe.
If it is dirty, air cannot get through. The AC makes cold air, but the fan cannot push it to you.
Where is it? It is usually behind the glove box.
How to check: Pull it out. Is it gray? Is it full of dust? Buy a new one. They are cheap. It takes five minutes to change.
Frequently Asked Questions (FAQ)
Here are answers to the most common questions I get.
Where do I put the Freon in my car?
You must put Freon in the Low-Pressure Port. Look for the thick aluminum tube. It will have a cap. The cap is often blue or black. It might have an “L” on it. Do not use the High-Pressure port. That is unsafe.
Can I use any refrigerant?
No, you cannot. You must use the specific type for your car. Most cars built between 1994 and 2020 use R-134a. Newer cars use R-1234yf. Check the sticker under your hood to be sure. Using the wrong one can damage your system.
How do I find the low pressure port?
Open the hood. Find the AC compressor. It is driven by a belt. Look for two lines coming from it. Trace the thicker line. The service port on the thick line is the one you need. It is usually on the passenger side near the firewall or the front.
What happens if I overcharge the AC?
Overcharging causes high pressure. The compressor will strain. It might stop working safely. The air will actually get warmer, not colder. In bad cases, hoses can burst. Always stop when the gauge is in the green zone.
Is it illegal to vent Freon?
Yes, it is illegal. Environmental laws say you cannot release refrigerant into the air on purpose. It harms the ozone layer. If you have a system full of old gas, a shop must remove it. They have machines to capture it safely.
How long does a recharge last?
It depends on the leak. If the leak is tiny, it could last years. If the leak is big, it might last days. A sealed system should never need a recharge. If you need gas, you have a leak.
Conclusion
We have covered a lot today. We talked about safety. We found the low-pressure port. We learned how to read the gauge.
Remember the feeling of that hot car? The sticky seats? The hot wind? You do not have to live with that.
You now have the knowledge. You know where to put Freon in car. You know how to do it safely.
Let’s recap the big steps:
- Buy the right kit. (R-134a for most).
- Find the Low Port. (Thick line, Small port).
- Check the Pressure. (Don’t fill a full system).
- Fill slowly. (Watch the gauge).
- Enjoy the cool air.
You can do this. Take a deep breath. Put on your safety glasses. Go open that hood.
Imagine your next drive. You are cruising down the highway. The music is on. The air is crisp and cold. You are comfortable. You did that. You fixed it.
Now, go make your car cool again. Good luck!